domingo, 1 de noviembre de 2015

Improve miniatures in LibreOffice

How can I see my icon files better in LibreOffice?...

There is just a snag with some of my files, and I found a solution to fix that.

You only have to install this PPA in your pc.

sudo add-apt-repository ppa:atareao/thumbnailers
sudo apt-get update
sudo apt-get install lothumbnailer


Then of this, clean cache with:

rm ~/.cache/thumbnails/fail/gnome-thumbnail-factory/*
rm ~/.cache/thumbnails/large/*
rm ~/.cache/thumbnails/normal/*
killall nautilus


ooo en acción

 That's all to look like that.

Gis-Weather Widget Updated and Now Support Ubuntu 15.10 Wily

Gis-Weather widget tool is easily and massively customizable for Linux desktop, it displays detailed weather forecast. It acts just like conky but with this you don't need to worry about fixing the code in any kind of script, it has super easy weather setup. You can add as much location as you want and add as many widgets as you like, you choose location by right-click + choose to display weather information on the widget. It allows you to change its appearance (background, icons, text, window settings), display on all desktops, lock position to the desktop, choose presets themes for widgets and more customization can be done from its preferences.


Features:

    View weather for several days
    Detailed weather forecast for today and tomorrow
    Fast switching between cities
    Select the background and theme weather icons
    "Compass" with the wind direction, with adjustable angle of rotation
    Highlighting the high wind
    Supported weather services:
        Gismeteo.com
        AccuWeather.com
        OpenWeatherMap.org
    Support SVG and widget scale
    Indicator to panel
    Presets


Available for Ubuntu 15.10 Wily/15.04 Vivid/14.04 Trusty/12.04 Precise/Linux Mint 17.x/17/13/other Ubuntu derivatives
To install Gis-Weather Widget in Ubuntu/Linux Mint open Terminal (Press Ctrl+Alt+T) and copy the following commands in the Terminal:
Terminal Commands:
sudo add-apt-repository ppa:noobslab/apps
sudo apt-get update
sudo apt-get install gis-weather


To remove Gis-Weather simply run following command in the Terminal:
Terminal Commands:
sudo apt-get remove --purge gis-weather
That's it 

Panel Indicators Collection for Ubuntu 15.04 Vivid/14.10 Utopic


 Are you used to use panel indicators? Can't you find all useful indicators in one place? So here we brought mostly used indicators for you in one place, for now you don't need to explore the Internet to locate them, if any indicator is mission let us know in the comment below (or just drop a line with some info via contact page) and we will add it in this list. Application indicators helps us access bold features of the application or standalone indicator offers various functionality to make user experience better on desktop computer. Since this long list of indicators only available for Ubuntu 15.04 Vivid/14.10 Utopic, previously we had shared useful indicators for 14.04 and 12.04, if you are using any of that version make sure you check these Indicators for Ubuntu 14.04 Vivid/Linux Mint 17.x & Indicators for 12.04 Precise.
These indicators can work with most of Linux desktop environments (compatible with panel using AppIndicator) like Unity, Gnome, Cinnamon, Mate, Xfce, and others. You may find some indicator doesn't load in specific desktop, I didn't tested in all desktops but let us know if this happens to you.


1: Indicator Netspeed Unity
Netspeed Unity Indicator displays the current upload/download speed on the unity panel. It is compatible with most of the panels, it can work with any panel which uses AppIndicators. If you are using multiple network interface, it also allows you to choose between them to check speed.
You can change position of the indicator, gsettings:/apps/indicators/netspeed-unity (use dconf-editor)


 To install Indicator Netspeed Unity in Ubuntu/Linux Mint open Terminal (Press Ctrl+Alt+T) and copy the following commands in the Terminal:
Terminal Commands:
sudo apt-add-repository ppa:fixnix/netspeed
sudo apt-get update
sudo apt-get install indicator-netspeed-unity

 2: Copyq Indicator
CopyQ is advanced clipboard manager with searchable and editable history with support for image formats, command line control and more. Command interface and graphical interface accessible from tray. By default the application stores any new clipboard content in list in the first tab. Main window can be opened by either left clicking on tray icon, running command copyq show or using system-wide shortcut (configurable from Preferences).


To install Copyq in Ubuntu/Linux Mint open Terminal (Press Ctrl+Alt+T) and copy the following commands in the Terminal:
Terminal Commands:
sudo add-apt-repository ppa:noobslab/indicators
sudo apt-get update
sudo apt-get install copyq

3: System Monitor Indicator
System Monitor display CPU and memory usage on panel, Also you can access system monitor from this indicator.
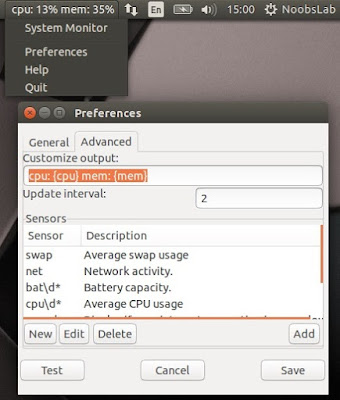


To install SysMonitor-indicator in Ubuntu/Linux Mint open Terminal (Press Ctrl+Alt+T) and copy the following commands in the Terminal:


 Terminal Commands:
sudo add-apt-repository ppa:fossfreedom/indicator-sysmonitor
sudo apt-get update
sudo apt-get install indicator-sysmonitor


4: Keylock Indicator
Indicator keylock is very useful utility, if your laptop/keyboard doesn't have leds to indicate that Num/Caps/Scroll keys are turned on/off. It shows notification on/off whenever Num/Caps/Scroll keys pressed and it allows indicator to choose icon between Num/Caps/Scroll to show in indicator panel. So with this utility a user can quickly see if Num lock, Caps lock or Scroll lock is turned on/off. After installation start indicator keylock from dash/menu, first time it doesn't show indicator in panel but works perfectly then you need to press any lock key and indicator will popup in panel then go to preferences and select option 'show indicator while lock key is inactive'.
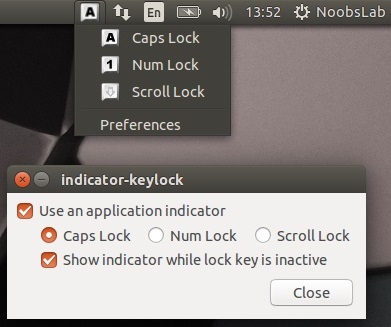


 To install Keylock indicator in Ubuntu/Linux Mint open Terminal (Press Ctrl+Alt+T) and copy the following commands in the Terminal:
Terminal Commands:
sudo add-apt-repository ppa:noobslab/indicators
sudo apt-get update
sudo apt-get install indicator-keylock


5: Caffeine Indicator
Caffeine indicator allows user to temporary disable screensaver/sleep mode, Also there is option to add program in list to disable screensaver permanently for that program.


 To install Caffeine indicator in Ubuntu/Linux Mint open Terminal (Press Ctrl+Alt+T) and copy the following commands in the Terminal:
Terminal Commands:
sudo add-apt-repository ppa:caffeine-developers/ppa
sudo apt-get update
sudo apt-get install caffeine


6: Crypt-folder Indicator
With Crypt-Folder you can manage EncFS folders via this indicator, You can mount, unmount EncFS folders, create new EncFS folders, stores the password in Gnome Key-ring and mounts it at login, change existing EncFS folders password.


 To install Cryptfolder indicator in Ubuntu/Linux Mint open Terminal (Press Ctrl+Alt+T) and copy the following commands in the Terminal:
Terminal Commands:
sudo add-apt-repository ppa:atareao/atareao
sudo apt-get update
sudo apt-get install cryptfolder-indicator


7: Windows-List Indicator
Window-list is an application indicator to display a list of all current open windows via indicator. Each window can be activated by selecting from the list.
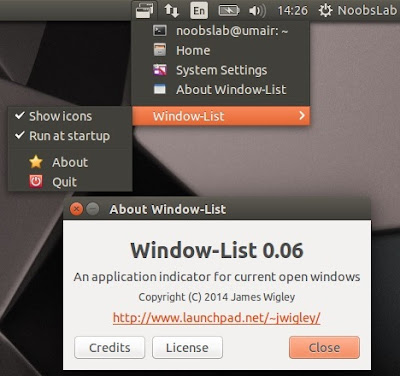


 To install Window-List indicator in Ubuntu/Linux Mint open Terminal (Press Ctrl+Alt+T) and copy the following commands in the Terminal:
Terminal Commands:
sudo add-apt-repository ppa:jwigley/window-list
sudo apt-get update
sudo apt-get install window-list


8: Tomboy Notes Indicator
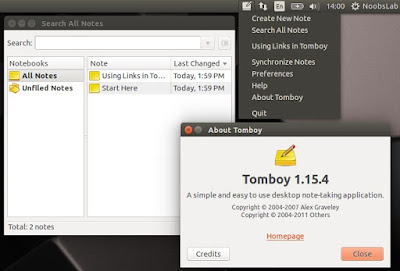
Tomboy is a desktop note-taking application which is simple and easy to use. It lets you organise your notes intelligently by allowing you to easily link ideas together with Wiki style interconnects.


To install Tomboy Notes indicator in Ubuntu/Linux Mint open Terminal (Press Ctrl+Alt+T) and copy the following commands in the Terminal:
Terminal Commands:
sudo apt-get install tomboy


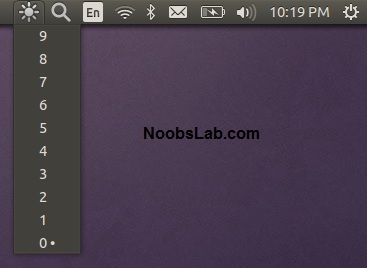
9: Brightness Indicator
Brightness indicator allows you to control your laptop display brightness with indicator.

Features:
- Clicking the icon shows you all the possible brightness values, to a maximum of 15 steps.
- The current value is indicated with a dot.
- Clicking a menu item sets the brightness to the desired value.
- Scroll wheel event is enabled on the icon. Scrolling up means higher brightness, scrolling down lower.
- Control screen brightness with custom keyboard shortcuts.


To install Brightness indicator in Ubuntu/Linux Mint open Terminal (Press Ctrl+Alt+T) and copy the following commands in the Terminal:
Terminal Commands:
sudo add-apt-repository ppa:indicator-brightness/ppa
sudo apt-get update
sudo apt-get install indicator-brightness


10: Diodon Indicator
Diodon is a lightweight clipboard manager for Linux written in Vala which "aims to be the best integrated clipboard manager for the Gnome/Unity desktop".
Diodon features include Ubuntu indicator, clipboard sync (primary selection and Ctrl+C / Ctrl+V clipboard) and an option to set the clipboard size.


 To install Diodon indicator in Ubuntu/Linux Mint open Terminal (Press Ctrl+Alt+T) and copy the following commands in the Terminal:
Terminal Commands:
sudo add-apt-repository ppa:diodon-team/stable
sudo apt-get update
sudo apt-get install diodon


 .................Soon More Indicators for Ubuntu :D 

sábado, 26 de septiembre de 2015

Top 50 distros of Linux


fsf Distribuciones Linux para todos: Top 50Systems or Linux distributions have been criticized by some for its no standardization for blurring the work of the entire development community hundreds of different distributions. This is true that creates problems, such as the need to create different packages for different package managers (.rpm, .deb, ...) and extra effort from the developers of applications and drivers to make them work well in any distro. Even for those who study on Linux it is tedious because you have to learn certain peculiarities of some distributions and handle all such packages.

That aside, I must say that there are as many distributions as tastes. Therefore we can benefit from this diversity and install the most appropriate for our work or purpose. This article list the 50 most used Linux distributions. The Top 50 is as follows in this order:

  1. Ubuntu
  2. Red Hat Enterprise Linux
  3. Debian
  4. SuSE
  5. Linux Mint
  6. Slackware
  7. Gentoo
  8. Arch Linux
  9. Fedora
  10. openSuSE
  11. Kubuntu
  12. Lubuntu
  13. Xubuntu
  14. Edubuntu
  15. Easy Peasy
  16. Zentyal
  17. NewSense
  18. Pinguy OS
  19. Bodhi Linux
  20. MoonOS
  21. MEPIS
  22. CrunchBang
  23. Knoppix
  24. DreamLinux
  25. Mandriva
  26. CentOS
  27. Scientific Linux
  28. Fusion
  29. Unity
  30. Mageia
  31. ZenWalk
  32. Vector Linux
  33. Frugalware
  34. Salix OS
  35. Chakra
  36. ArchBang
  37. Sabayon
  38. Joli OS
  39. Peppermint
  40. aLinux
  41. DSL
  42. Tiny Core Linux
  43. Puppy Linux
  44. Zorin OS
  45. Ylmf OS
  46. GoboLinux
  47. PCLInuxOS
  48. MeeGo
  49. Chrome OS
  50. Musix GNU+Linux

Install the latest version of Gambas on Ubuntu and begins to program applications

gambas ubuntu
Gambas Almost Means Basic, is analogous to the Visual Studio on Windows. It is a visual programming environment for BASIC -derived much like Java- and allows us to develop applications easily, thanks to that program in a high-level code.
It's as easy as dragging the item you want to include and scheduling function. The best of this programming environment is definitely, which is open source, it is distributed in GPL, and therefore we have daily updates to fix bugs and add new features.
Gambas is so simple you do not need prior knowledge of any programming language. Just you need to have a hand and freely -free and time to learn, so it is perfect for students who are just beginning. In this case we will learn how to install the latest released from the repository version with these simple steps:

    
Open the terminal command.

    Enter these commands one by one:

    
sudo add-apt-repository ppa:-team shrimp / prawn-daily

    
sudo apt-get update

    
sudo apt-get install gambas3


With these commands get the latest released Gambas, currently version 3.8.1- go through, but we want the most stable we can use these other commands, but be aware that we can never add two PPA at a time, we can only choose one, as if not provoke a mistake and have to start the process from the beginning, first cleaning the installation:

     Open the terminal command.
     Enter these commands one by one:

     sudo add-apt-repository ppa: shrimp-team / gambas3

     sudo apt-get update

     sudo apt-get install gambas3

I personally recommend this latest version, which is stable, if you're starting out, because the other can give some other error. The best thing about this environment, if we come from Visual Basic, is that we have an interpreter who translates our programs to Gambas can interpret and compile without problems.

How to install MiniTube, to enjoy Youtube from your Desktop

minitubeMiniTube is a light and native application for Linux desktops with which you can watch YouTube content without opening a browser window. To do all that is needed is to find what we see in the search box, and search the content MiniTube showing immediate results. This will have two types of search: by channel and by keyword.

MiniTube has unlimited video streaming and playback application is smooth and instantaneous without notice buffering video without displaying any advertising-at least while I've been probando-. And best of all: MiniTube not need Flash Player to run.

The purpose of MiniTube is to offer an almost television user experience and not clone the YouTube web interface. It is not a creator of playlists, but you can create your own. You could say that until recently it easier to find videos on YouTube that interest you and get to see them.

In the lower right corner of MiniTube you can change the video quality. You can choose between three different resolutions: 360 points, 720 points and 1080 points, and this is independent of the options that the video quality offered on the web. This means you could choose to view a video in HD and display in a lower resolution, because it is not available in that capacity.
 
Installing MiniTube

To install MiniTube will not resort to the usual method of adding a PPA, resynchronize the repositories and install the package. In this case we will need to use a different method, which also vary depending on whether we use a 64-bit or 32-bit.

Minitube to install a 32-bit system introduces these commands in Terminal:


sudo apt-get install libqt5widgets5 libqt5network5 libqt5script5 libqt5sql5 libqt5sql5-sqlite libqt5dbus5 phonon4qt5 libphonon4qt5-4 phonon4qt5-backend-gstreamer
 wget -O minitube32.deb http://flavio.tordini.org/files/minitube/minitube.deb
 sudo dpkg -i minitube32.deb
 
 
32-Bits OS:
 
sudo apt-get install libqt5widgets5 libqt5network5 libqt5script5 libqt5sql5 libqt5sql5-sqlite libqt5dbus5 phonon4qt5 libphonon4qt5-4 phonon4qt5-backend-gstreamer
 wget -O minitube64.deb http://flavio.tordini.org/files/minitube/minitube64.deb
 sudo dpkg -i minitube64.deb 

Enjoy it :D 

miércoles, 2 de septiembre de 2015

Ubuntu 15.10 Beta 1 Is Now Available to Download


download-now-tile 
releases in the Ubuntu 15.10 Wily Werewolf development cycle are now available for download.
Kubuntu, Lubuntu, Ubuntu GNOME, Ubuntu MATE and Xubuntu are among the spins taking advantage of this development stop-gap.
The regular version of Ubuntu sits this round out and will issue its first, and only, beta snapshot next month.
Scroll on down to get a digest of what’s new in Ubuntu 15.10 Beta 1 flavours and to grab yourself an .iso image to trial out.

What’s New in Ubuntu 15.10 Beta 1?

new plasma desktop

 The array of changes put forward by the Ubuntu family differs dramatically between releases.

Kubuntu 15.10 Beta 1 features the biggest set of changes. It offers the shiny new Plasma 5.4 desktop as default (see our earlier post for more on what that brings) and offers the latest KDE Applications 15.08 suite.


Link: http://cdimage.ubuntu.com/kubuntu/releases/wily/beta-1/

Ubuntu GNOME 15.10 Beta 1 offers much of the latest GNOME 3.16 stack – enjoy it while it’s current, as 3.18 is on the way!. You get GNOME-Shell 3.16, a stack of GNOME 3.16 applications, a new GNOME getting started guide and GNOME Photos installed by default (Shotwell remains available).

Link:  http://cdimage.ubuntu.com/ubuntu-gnome/releases/wily/beta-1/


Lubuntu 15.10 Beta 1 sees only minimal bug fixes applied. Once again, all development effort is focused on getting the new LxQt desktop ship-shape in time for its tentative use as Lubuntu default in October 2016.

Link: http://cdimage.ubuntu.com/lubuntu/releases/wily/beta-1/

Xubuntu 15.10 Beta 1 swaps hardy office stalwart Abiword with LibreOffice Writer, something some have long considered overdue. It also ships updates for a sizeable set of the default Xubuntu app stack, including new versions of gMusicBrowser, LightDM-GTK-Greeter and the nimble Thunar file manager.

 Link: http://cdimage.ubuntu.com/xubuntu/releases/wily/beta-1/

Finally, Ubuntu MATE 15.10 Beta 1 bumps the MATE desktop to version 1.10 (“mostly”), offers a refreshed MATE welcome tool, a new version of the helpful MATE Tweak Tool and integrates Deja Dup backup into the Caja file manager.

 Link: http://cdimage.ubuntu.com/ubuntu-mate/releases/wily/beta-1/

Beta = bugs

Beta releases of Ubuntu are not suitable for use as your default OS as the likelihood of bugs, breakages and other potential headaches remains high.
Ubuntu 15.10 final will be available to download on October 22, 2015.

 ubuntu 15.10 wily werewolf release schedule graphic